1. Install virtualbox
測試時安裝的版本是 ver 5.2.2
2. Install ubuntu
測試時安裝的版本是 ubuntu-16.04.3-desktop-amd64.iso此處我保留 80 GB 硬碟備用,安裝完後記得要在 virtualbox 介面新增一張 [僅限主機]介面卡,方便後續 windows/ubuntu 共享資料
3. 安裝編譯所需套件
$ sudo dpkg --add-architecture i386
$ sudo apt-get update
$ sudo apt-get install libc6:i386 libncurses5:i386 libstdc++6:i386
$ sudo apt-get install gawk wget git-core diffstat unzip texinfo gcc-multilib \
build-essential chrpath socat cpio python python3 python3-pip python3-pexpect \
xz-utils debianutils iputils-ping libsdl1.2-dev xterm
4. 下載 Poky 並且編譯
$ git clone git://git.yoctoproject.org/poky
$ cd poky
$ git checkout tags/yocto-2.4 -b poky_2.4
$ sudo mkdir /scratch
$ sudo chown albert /scratch
$ mkdir working
$ cd working
$ source ../poky/oe-init-build-env build-qemuarm
$ vi conf/local.conf
MACHINE = "qemuarm"
TOPDIR = "/home/albert/working/build-qemuarm"
DL_DIR = "/scratch/downloads"
SSTATE_DIR = "/scratch/sstate-cache"
$ bitbake core-image-minimal
因為是一邊下載,一邊編譯,所以第一次執行要等很久...建議作完此步驟就可以離開電腦了,大概過一個晚上才會完成。第二次編譯時,因為檔案已經下載至 /scratch/downloads,所以應該可以在五分鐘內完成
5. 執行 qemuarm
$ runqemu qemuarm core-image-minimal nographic
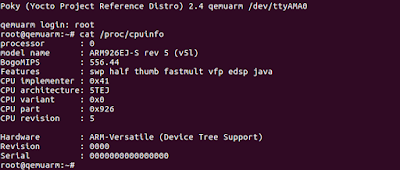
執行畫面截圖如下:
6. 離開 qemuarm
在 qemuarm 視窗內,按下 CTRL+A ,接著按下 X
7. 新增一個新的 layer,並且加入 example code
$ cd /home/albert/working
$ . ~/poky/oe-init-build-env build-qemuarm
$ yocto-layer create ypdd

$ vi /home/albert/working/build-qemuarm/conf/bblayers.conf
加上 /home/albert/working/build-qemuarm/meta-ypdd
$ mkdir -p /home/albert/working/build-qemuarm/meta-ypdd/recipes-core/images
$ vi /home/albert/working/build-qemuarm/meta-ypdd/recipes-core/images/ypdd-image.bb
DESCRIPTION = "A core image for YPDD"$ bitbake ypdd-image
LICENSE = "MIT"
# Core files for basic console boot
IMAGE_INSTALL = "packagegroup-core-boot"
# Add our desired packages
IMAGE_INSTALL += "psplash dropbear example"
inherit core-image
IMAGE_ROOTFS_SIZE ?= "8192"
$ runqemu qemuarm tmp/deploy/images/qemuarm/ypdd-image-qemuarm.ext4 nographic
root@qemuarm:~# helloworld
Hello World!
8. 支援 NFS
$ sudo apt-get install nfs-kernel-server
$ sudo mkdir -p /srv/nfs/qemuarm
$ sudo chmod 777 /srv/nfs
$ sudo vi /etc/exports
# /etc/exports: the access control list for filesystems which may be exported
# to NFS clients. See exports(5).
/srv/nfs/qemuarm 192.168.7.2(rw,no_root_squash)
$ sudo /etc/init.d/nfs-kernel-server restart
$ sudo modprobe tun
$ cd ~/working/build-qemuarm
$ bitbake meta-ide-support
$ bitbake ypdd-image
$ runqemu-extract-sdk tmp/deploy/images/qemuarm/ypdd-image-qemuarm.tar.bz2 /srv/nfs/qemuarm
Finally, launch:
$ runqemu qemuarm nfs /srv/nfs/qemuarm nographic
9. 編譯時一併產生 gdb 與 strace
$ vi ~/working/build-qemuarm/conf/local.conf
- EXTRA_IMAGE_FEATURES ?= "debug-tweaks"
+ EXTRA_IMAGE_FEATURES ?= "tools-debug debug-tweaks"
10. 編譯時一併產生 perf, valgrind
$ vi ~/working/build-qemuarm/conf/local.conf- EXTRA_IMAGE_FEATURES ?= "debug-tweaks"+ EXTRA_IMAGE_FEATURES ?= "tools-debug debug-tweaks tools-profile"
11. 支援其他 CPU 型號
首先修改 device tree
$ mkdir -p ~/working/build-qemuarm/meta-ypdd/recipes-kernel/linux
$ cd ~/working/build-qemuarm/meta-ypdd/recipes-kernel/linux
$ vi linux-yocto_4.12.bbapped
vi linux-yocto_%.bbappend
+ KERNEL_DEVICETREE_qemuarm = "vexpress-v2p-ca9.dtb"
$ bitbake linux-yocto
需要確認 tmp 目錄下是否有產生 vexpress-v2p-ca9.dtb,有的話就是改對了。
$ cd ~/working/build-qemuarm/tmp/deploy/images/qemuarm
$ ls *.dtb
接著修改 qemuarm.conf 以支援 cortexa9
$ mkdir -p ~/working/build-qemuarm/conf/machine
$ cd ~/working/build-qemuarm/conf/machine
$ cp ~/poky/meta/conf/machine/qemuarm.conf ./qemuarm.conf
$ vi qemuarm.conf- require conf/machine/include/tune-arm926ejs.inc重新編譯並且執行
+ require conf/machine/include/tune-cortexa9.inc
## For runqemu
- QB_MACHINE = "-machine versatilepb"
+ QB_MACHINE = "-machine vexpress-a9"
- QB_DTB = "${@base_version_less_or_equal('PREFERRED_VERSION_linux-yocto', '4.7', '', 'zImage-versatile-pb.dtb', d)}"
+ QB_DTB = "${@base_version_less_or_equal('PREFERRED_VERSION_linux-yocto', '4.7', '', 'zImage-vexpress-v2p-ca9.dtb', d)}"
$ cd ~/working/build-qemuarm
$ bitbake ypdd-image
$ runqemu qemuarm nographic
支援 cairo
$ vi ypdd-image.bb
IMAGE_INSTALL += "psplash dropbear example cairo glib-2.0 pixman freetype libpng"
編譯時顯示的 Build Configuration,摘錄差異處如下:
ARM9:
TUNE_FEATURES = "arm armv5 thumb dsp"??Cortex-A9
TARGET_FPU = "soft"
TUNE_FEATURES = "arm armv7a vfp thumb neon callconvention-hard"
TARGET_FPU = "hard"
11. 其他小技巧
套用 bitbake 的顏色高顯
https://superuser.com/questions/844004/creating-a-simple-vim-syntax-hightlighting列出 recipe 列表
http://git.yoctoproject.org/cgit.cgi/poky/plain/bitbake/contrib/vim/
$ bitbake -c listtasks core-image-minimal檢視 recipe 的環境
$ bitbake -e core-image-minimal
修改 Kernel 設定
$ bitbake -c menuconfig virtual/kernel
清除某個 recipe 並且重新編譯
$ bitbake -c clean foo
$ bitbake -f -c compile foo
參考資料:
- http://www.yoctoproject.org/tools-resources/presentations
- http://www.yoctoproject.org/docs/2.4/yocto-project-qs/yocto-project-qs.html
- https://www.slideshare.net/coldnew/build-your-own-embedded-linux-distributions-by-yocto-project
- https://www.slideshare.net/STDBIT/yocto-project-and-open-embedded-training
- https://events.static.linuxfound.org/sites/events/files/slides/ELC2015-YOSHI-PokyDebian_0.pdf
- http://www.gnu.org/software/bash/manual/bashref.html
- https://www.openembedded.org/wiki/Bitbake_cheat_sheet
- http://autobuild.buildroot.org/
- https://www.safaribooksonline.com/library/view/mastering-embedded-linux/9781787283282/4b79f32b-63a9-43ec-af42-e1cacbe2b280.xhtml
